
An ergonomic office checklist is only useful if you can finish it. This one works from the floor up to your eyes, so you can do the whole audit in a single sitting with a tape measure, a phone camera and a few books or boxes for testing heights. At each point you get three things: a check to run, the most common fix, and a call on whether the problem is worth spending money on or whether you should skip the purchase.
The order matters. Aches usually come from how your body is positioned across several points at once, so a new chair will not fix a monitor that pulls your head forward. Work through everything first, then decide what to change.
Start with your body, not your gear: a two-minute posture baseline
Before you touch any equipment, record how you actually sit. Prop your phone to the side of your desk, sit down and work as you normally would for two minutes, then check the video. Most people find they sit differently from how they think they sit.

Look for these in the recording:
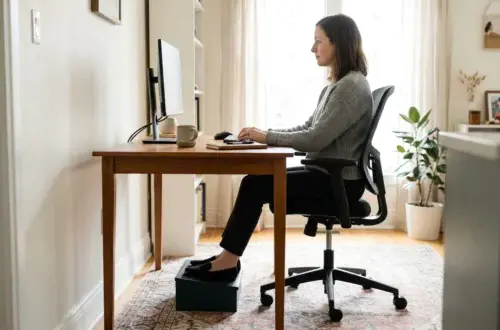
- Head position. Your ears should sit roughly over your shoulders. If your chin juts toward the screen, your neck is carrying the difference.
- Shoulders. Raised or rolled forward shoulders usually mean the desk, keyboard or armrests are at the wrong height.
- Lower back. Check whether your pelvis tilts backward and your spine curves into a C shape, or whether you arch away from the backrest.
- Knees and feet. Feet should rest flat on the floor or a footrest, and knees should sit at about the same height as your hips or slightly lower.
- Wrists. Look for bending upward, downward or sideways while you type.
Next, note where you feel discomfort. Write down the location (neck, upper back, lower back, wrists, hips, eyes) and when it shows up, such as mid-morning, late afternoon or only after long calls. This list is your map for the rest of the audit. Neck and eye strain point toward the monitor and lighting sections. Wrist and forearm pain point toward the keyboard and mouse. Lower back and hip pain point toward the chair and desk height.
Spend or skip: Skip spending here. The baseline costs nothing, and it keeps you from buying equipment for a problem you do not have.
Chair: the four checks that tell you whether it fits you
The chair is the part of your workstation that touches the most of your body, so check it first. Four measurements tell you most of what you need to know.
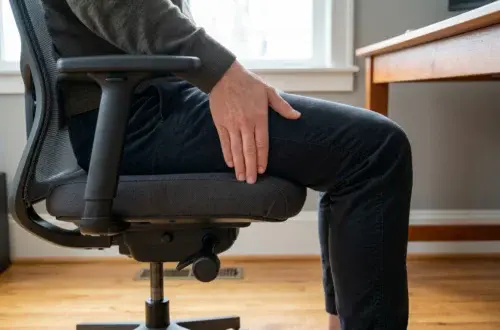
- Seat height. With your feet flat on the floor, your thighs should be roughly level with the ground or sloping slightly down. If your feet dangle, the seat is too high or the chair cannot go low enough.
- Seat depth. Sit all the way back and slide two or three fingers between the front edge of the seat and the back of your knee. If you cannot, the seat is too deep and presses on your legs. If there is a large gap, it is too shallow to support your thighs.
- Lumbar support. The curve of the backrest should meet the inward curve of your lower back. If it hits above or below that curve, you will slump forward to find support somewhere else.
- Armrests. Your shoulders should stay relaxed while your forearms rest lightly on the pads. If you have to shrug to reach them, lower them. If you lean sideways onto them, they are too wide or too low.
Common fix: Most chairs have more adjustment than people use. Raise or lower the seat, slide the seat pan, set the backrest angle and move the armrests before you decide the chair is the problem. The full walkthrough is in how to adjust an ergonomic office chair, setting by setting, and if the aches persist after you have adjusted everything, this symptom-by-symptom guide shows which setting to revisit for each type of pain.
Spend or skip: Spend only if the chair fails a check and cannot be adjusted to fix it. A seat that is too deep with no slide mechanism, or a backrest with no lumbar support, is a design limit. If you reach that point, the features worth keeping in a chair under $300 will help you shop without overpaying. If the chair passes all four checks, skip the upgrade, however old or plain it looks.
Desk height and standing options: where your elbows should land
Desk height is judged by your elbows. Sit with your upper arms hanging naturally from your shoulders and bend your elbows to about 90 degrees, or a little more open. Your forearms should reach the keyboard without lifting your shoulders or reaching down.
Check: With the chair set correctly for your legs, see where your elbows land relative to the desk surface. If the desk is higher than your elbows, your shoulders creep up as you type. If it is lower, you hunch over to reach the keyboard. Also confirm that you have clearance under the desk, so your knees and thighs are not bumping the underside or a drawer.
Common fix: If the desk is too high and cannot be lowered, raise the chair and add a footrest so your feet stay supported. A sturdy box or a stack of books works for testing before you buy anything. If the desk is too low, risers under the legs or a keyboard tray that sits at the right height can correct it.
Standing is a separate question. A standing option lets you change position through the day, but standing all day creates its own strain, so the point is variety. If you use one, the same elbow rule applies at standing height: forearms level with the keyboard, shoulders relaxed, monitor adjusted to match.
Spend or skip: Skip a new desk if the height can be fixed with the chair, a footrest or a keyboard tray. Spend on an adjustable-height desk only if you will genuinely alternate positions, or if several people of different heights share the workspace. If you are weighing options, this roundup of standing desks for office use covers what is on the market.
Monitor: distance, height and angle for your neck and eyes
Monitor position drives neck pain and eye fatigue more than most people expect. Three measurements cover it.

- Distance. Sit back in your chair and extend your arm. Your fingertips should reach about the screen. If you lean forward to read text, the screen is too far or the text is too small.
- Height. The top edge of the screen should sit at or slightly below your eye level, so your gaze falls a little downward on the center of the screen. A screen that sits low forces your head to tilt down, and one that sits high makes you tilt back.
- Angle. Tilt the screen back slightly so the surface faces your eyes squarely and does not reflect lights behind you. The screen should sit directly in front of you, not off to one side.
Common fix: Raise a low laptop or monitor on a stand or a stack of sturdy books. For a laptop, a separate keyboard and mouse are what make a raised screen workable, since otherwise you cannot raise the screen without lifting your hands. If text is hard to read from arm’s length, increase the font size or display scaling before moving the screen closer.
If you use two monitors, put the one you look at most directly in front of you and angle the second one in. If you split your time evenly, center the seam between them in front of you.
Spend or skip: Skip a new monitor if the current one can be raised, tilted and set to a readable text size. Spend a small amount on a stand or arm if your screen cannot reach the right height. A new display only makes sense when text is unreadable at a comfortable distance or the screen is too small for your work.
Keyboard, mouse and wrist support: keeping your forearms neutral
The goal here is a neutral wrist, meaning your hand is in a straight line with your forearm, not bent up, down or sideways. Your upper arms stay close to your body and your forearms are roughly level.
Check: Look at your wrists in the video from the baseline. Are they flexed upward to reach the keys? Are they angled outward toward the mouse? Is the mouse far enough from the keyboard that you reach with your whole arm? Notice, too, whether you rest your wrists on the desk edge while typing, which presses on soft tissue.
Common fix:
- Keep the keyboard flat or at a slight negative tilt, and avoid propping up the back feet if your wrists bend upward as a result.
- Place the mouse right beside the keyboard, at the same height.
- Use a wrist rest as a place to pause between bursts of typing, not as a rest for your wrists while you type. The benefits of using a wrist rest explain how to use one properly.
- If you have small hands, a shorter rest and a compact keyboard make a bigger difference than people expect. This guide to wrist rests for small hands covers sizing.
Spend or skip: A wrist rest and a decent mouse pad are cheap and worth buying if your wrists contact a hard edge. An ergonomic keyboard or vertical mouse is worth a try only if you have persistent forearm or wrist discomfort after fixing the positions above. If you want ideas on what is available, wireless ergonomic office accessories lists several. Skip specialized gear if your wrists are straight and you feel no strain.
Lighting, glare and airflow: the checks people forget
These three affect how long you can work comfortably, and they rarely appear on a basic checklist.
Lighting and glare. Place your screen at a right angle to windows, with the window to your side rather than behind or in front of you. A window behind the screen reflects in it and a window behind you makes the screen look dim in contrast. Check for reflections by turning the screen off and looking at the black surface. Any lamp or window you can see in it is a source of glare.
Common fix: Close blinds or curtains during the brightest part of the day, move the desk, or reposition lamps so they light the desk surface without shining on the screen. Match screen brightness to the room: if the screen looks like a light source in a dim room, it is too bright. A desk lamp aimed at your paper or keyboard area helps if you work from documents.
Airflow and temperature. A workspace that is too warm makes you restless and fidgety, and sitting in a stuffy spot wears down your focus. Check whether air moves across your seat and body, and whether a vent blows directly on your neck or hands. Cold hands can make typing uncomfortable too.
Common fix: Redirect vents, open a window when the weather allows, or add a small fan. If your chair traps heat, a mesh back can help; these breathable mesh chairs for hot offices are one option, and the best desktop fans for 2026 cover the cheaper alternative.
Spend or skip: Skip new lighting if repositioning and blinds solve the glare. Spend on a fan before you replace a chair for heat reasons. Replace the chair for airflow only if heat is the main reason you stop sitting in it.
Headset, phone and everyday reach: items that quietly twist your posture
Small, frequently used items cause repetitive strain because you do the same awkward movement dozens of times a day.
Check: Over the next hour, watch what you reach for. Do you cradle a phone between ear and shoulder on calls? Do you twist to reach a notebook, a second screen, a printer or a drink? Do you stretch to use the mouse, or lean sideways to see a document?
Common fix:
- Use a headset or speakerphone for calls longer than a minute or two, so your neck stays upright.
- Keep the things you use many times a day within a forearm’s reach: phone, notebook, water, pen.
- Move items you use rarely, like a printer, out of arm’s reach so you stand up to get them.
- Put the document you copy from on a stand beside the monitor, at screen height, instead of flat on the desk.
Spend or skip: A headset is worth buying if you spend significant time on calls. Comfort over several hours matters more than extra features. If you want to compare options, best headsets for remote work is a good place to begin, and if noise is part of the problem, noise-canceling headsets for working from home narrow the field. Skip a headset if you rarely take calls.
Breaks and movement: building the habit the equipment can’t replace
A well-adjusted workstation lowers strain, but staying in any one position for hours still tires your body. Equipment sets up good positions, and movement keeps you from holding any of them too long.

Check: Look at how long you go without leaving your chair. If you cannot remember your last break, the answer is probably too long.
Common fix:
- Stand, walk or stretch for a minute or two every half hour or so. A timer on your phone or computer makes it automatic.
- Every 20 minutes, look at something about 20 feet away for 20 seconds to rest your eyes.
- Change your position between breaks: sit back, sit forward, stand for a call, then sit again.
- Attach movement to things you already do, such as standing when the phone rings or walking while you take a call.
- Roll your shoulders and shake out your hands between long stretches of typing.
If you use a standing desk, rotate between sitting and standing instead of choosing one. If pain continues or gets worse despite a good setup and regular movement, talk to a healthcare professional rather than trying to fix it with equipment alone.
Spend or skip: Skip anything that promises to replace movement. A free timer does the job. If an accessory such as a kneeling chair gives you another way to sit for part of the day, this kneeling chair roundup is worth a look, but treat it as a second position and not a substitute for breaks.
Score your setup: what to fix today, what to upgrade later, what to leave alone
Now sort what you found. Go back through the sections and give each point one of three labels.
Fix today (free, under ten minutes). These are adjustments and rearrangements:
- Chair seat height, seat depth and armrest height
- Monitor height, distance and tilt
- Keyboard and mouse placement
- Screen position relative to windows
- Frequently used items moved within reach
- A break timer set on your phone
Upgrade later (small spend, only if a check failed). Do these one at a time so you can tell what helped:
- Laptop or monitor stand, footrest or keyboard tray
- Wrist rest or mouse pad
- A headset
- A fan or desk lamp
Leave alone. Anything that passed its check stays as it is. An older chair that fits you beats a new one that does not, and a plain desk at the right height needs nothing added.
Start with the discomfort list you wrote during the baseline. Fix the points that match your symptoms first, since those are the likeliest causes. Change one thing at a time and give each change several days before you judge it, so you know which adjustment made the difference. Repeat the video baseline after your fixes and compare it with the first recording.
Finally, for the larger picture of laying out the whole room, how to create a productive home office covers the space around the workstation. Run this ergonomic office checklist again whenever you change chairs, move the desk or start feeling a new ache, since each of those changes can undo the settings you worked out.